Prerequisites
- Complete your profile and KYC.
- Fund your source balance, which is the balance to be debited for bill payment. You can do this by
- Direct funding your balance.
- Indirect funding it by moving funds from a different balance to your source balance. Refer to the list of supported currencies for intra-wallet transfers.
- Whitelist your server IP’s for the API calls.
Supported Bill Types
Flutterwave supports payments for different bills, including Airtime, Data Subscriptions, Cable Payments, Internet Subscriptions e.g. IPNX, Utility Bills, and Tax Payments. To see the full list of supported bill payments, query the bill category endpoint.Making bill Payments
To successfully pay bills on Flutterwave, follow these steps:- Fetch the bill information to display to your customers.
- Collect and validate customer information.
- Initiate the bill payment request.
- Verify the payment status.
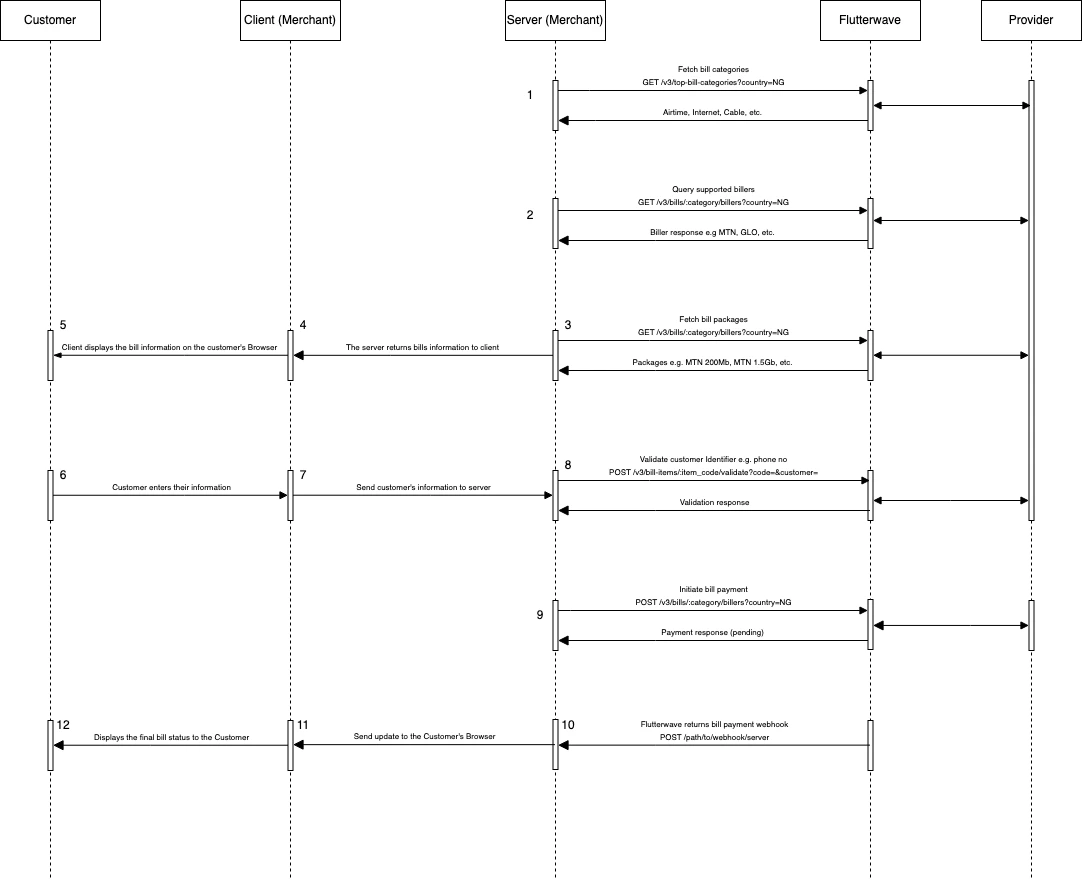
Step 1: Fetching Bills and Billers’ Information
Understanding the different types of bills is important for helping your customers select the correct one to pay. This process involves three steps:- First, call the high-level category API. This returns the supported categories for the country.
- With the category code, query the billers API, which returns billers for the selected category and country sent in the request.
- Finally, fetch the bill items (packages) by calling the bill item endpoint.
Step 2: Collect and validate the customer’s information
No validation is required for airtime and data bills.
- For airtime and mobile data bundles, the identifier is the customer’s phone number.
- For Wi-Fi Internet bundles, the identifier is the customer’s account number on that service.
- For electricity bills, the identifier is the customer’s meter number.
- For cable subscriptions, the identifier is the customer’s decoder or smart card number.
label_name field that contains a description of the identifier. Simply display this label next to a text box for your customer to enter their information.
Before proceeding with the payment, it’s highly recommended to validate the information provided by your customer. To do this quickly, pass the customer identifier and the biller_code into the validate bill API.
Step 3: Initiating the Bill Payment
On successful validation, Send the customer and biller create bill endpoint to initiate the payment. The important requirements for this request include:country: The customer’s country. It should match the value specified in the get category request.customer_id: The customer identifier validated in step 2.amount: The amount to be paid for the bill. This must matchdata.amountreturned from the get-bills endpoint.
reference in your request for easy tracking.
Sample Request
Sample Response
Step 4: Checking a Payment’s Status
We provide two seamless ways to query a payment’s status. You can poll the get status endpoint or receive webhooks for the payment. Using the get status endpoint, you should get a response like this:Managing your Bill Transaction History
Retrieve your payment logs using the transaction history APIs. We provide two different views for historical transactions:- Bill summary: This API reports the summary view of all the bill payments made in a period.
- Bill histories: This API returns the transaction log of all bill payments made.